How To Save A Transparent Background Image In Canva
Heat Transfer artworking can be one of the biggest challenges for a heat printer that's trying to get their business off the ground.
How can you design heat transfer artwork without learning professional programmes such as Adobe Photoshop, Illustrator or Corel Draw? How can you remove the white background from a graphic or a photo?
Canva is a popular low-priced online design platform that allows users to create a wide range of visual content without needing advanced design skills. It provides easy-to-use, drag-and-drop tools for creating everything from social media posts and presentations to flyers, posters, logos, and more. It also offers multiple AI tools that make editing artwork a lot easier and user-friendly.
There are two different types of backgrounds that you may need to remove when it comes to heat transfer artwork.
1. A white background from a graphic
2. The background of a photo to isolate a subject.
Canva offers various subscriptions, but the PRO subscription offers an automated background remover tool that is particularly handy for removing the background of photos. And it also offers you the ability to export a transparent background PNG file.
In this blog, we will walk you through where to find these features and how to use them.
Removing the background of a photo and exporting a transparent background file
Set your page up to meet your end transfer size requirements. As an example, if you need an A4 transfer size, set up an A4 Canva page to work off. This will help you visualise sizing as you're editing your images and artwork.
Once your photo is uploaded, you can click it from the file section and it will appear on your blank page. Here you can resize it, flip it, crop it etc until the proportions within the page are what you need them to be. As you can see in this example, the photo of the jumper has a background, as if it were taken on the floor. If you want to remove the jumper from the wood floor background, follow the below steps.
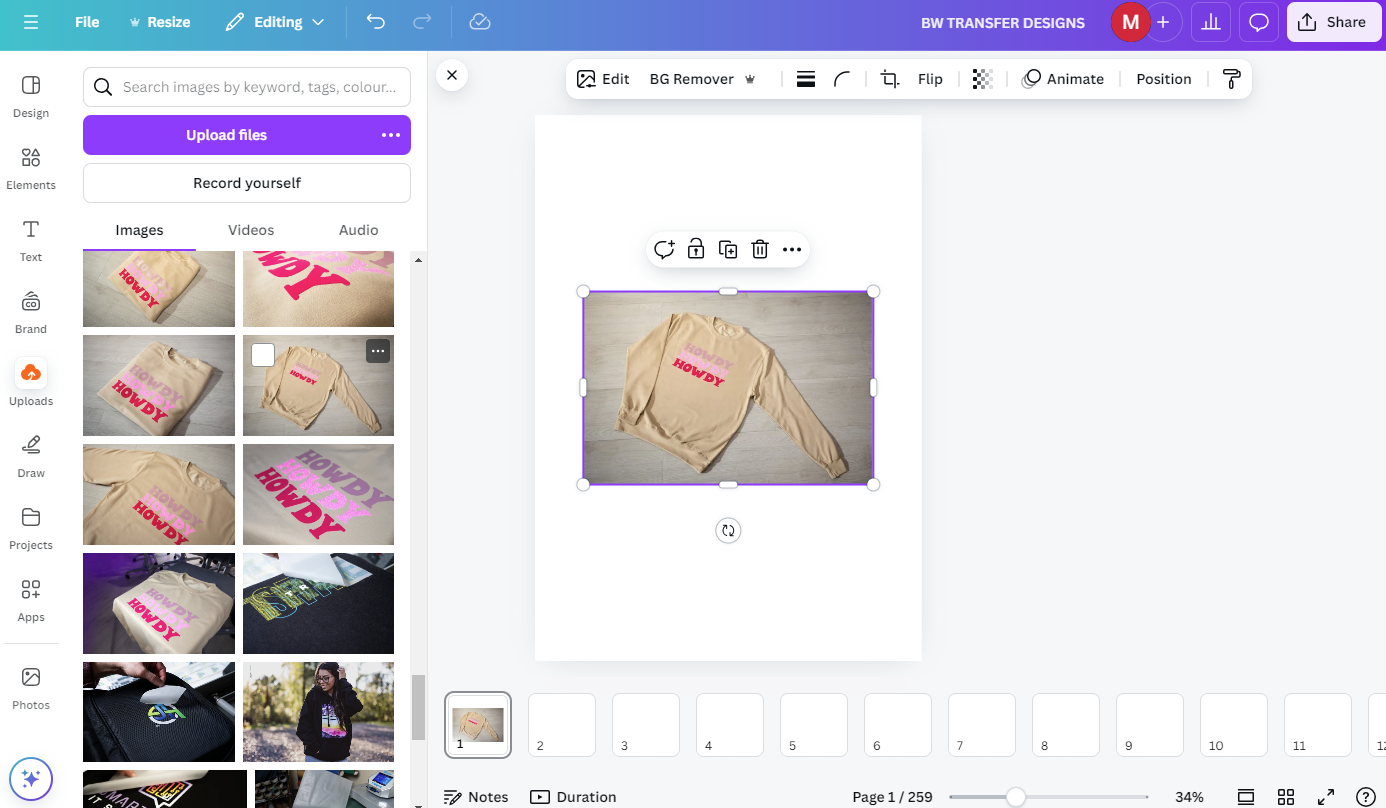

When the image is clicked on, a nav bar will appear above it giving you multiple edit options. With a PRO subscription, you will have the option to use the 'BG Remover' tool.
Once you click this option, Canva will do its best to cleanly remove what it determines to be the background of the subject.
It's worth noting that Canva's automated system doesn't always manage to do this cleanly. If the background of the image is littered with lots of details, it may leave some of them in the edit.
However, once you click the 'BG Remover' button for the second time, a new window will appear that will allow you to rectify this.
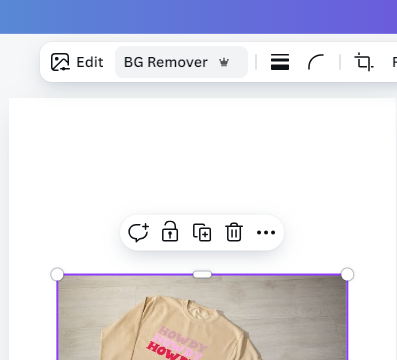

Inside this BG Remover window, you have the ability to use a brush tool to erase or restore parts of the edit. Adjust your brush size by changing the slider scale and selecting the Erase or Restore option. Begin clicking on the parts of the image you want to erase or restore. 9 times out of 10 you can get a nice clean edit using this tool.
Once you're done, click the X of the Background Remover box and this will exit out of the feature and take you back to the page you began working on.
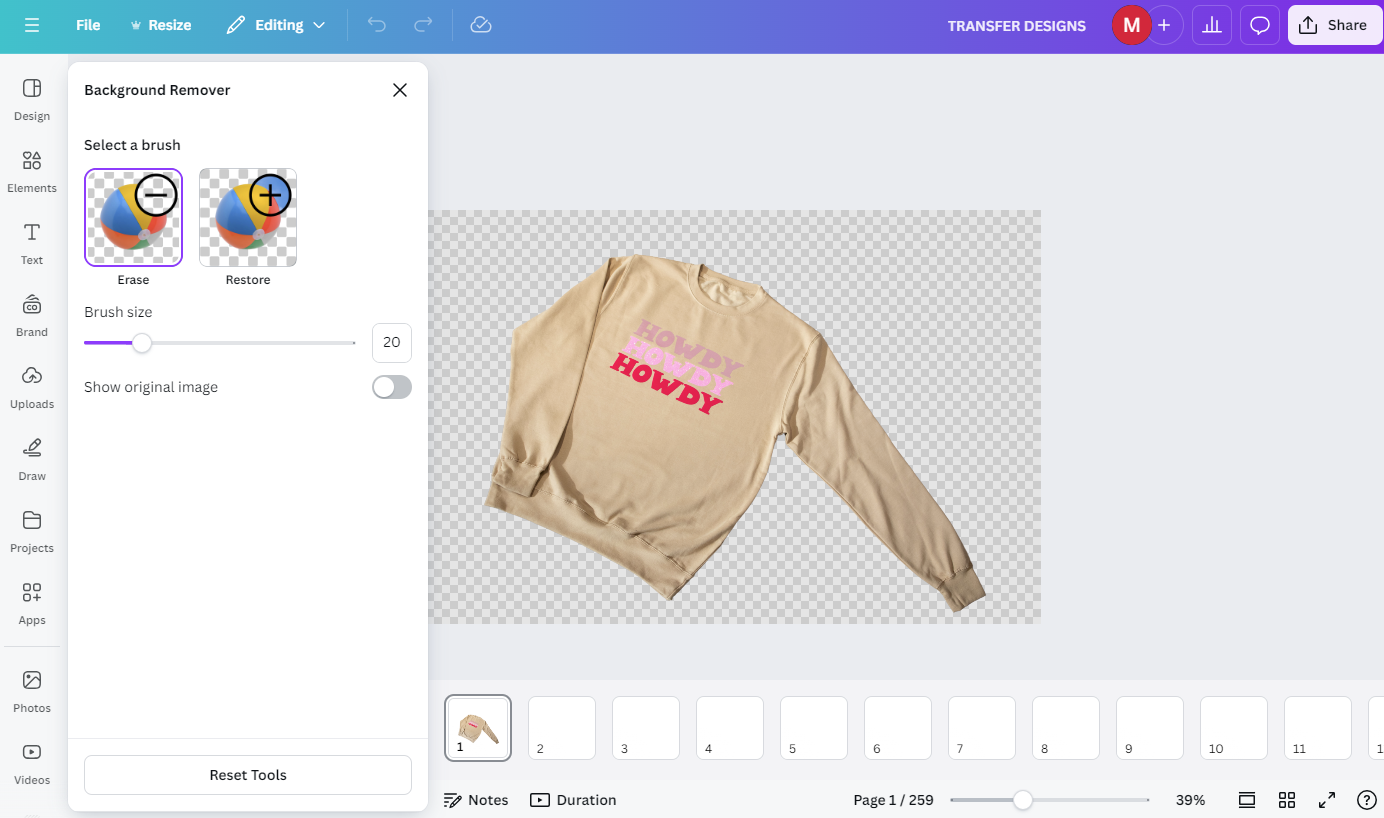

In the below image, you will see that the background of this image has now been totally removed and you can just see the page background of the document the image is placed upon.
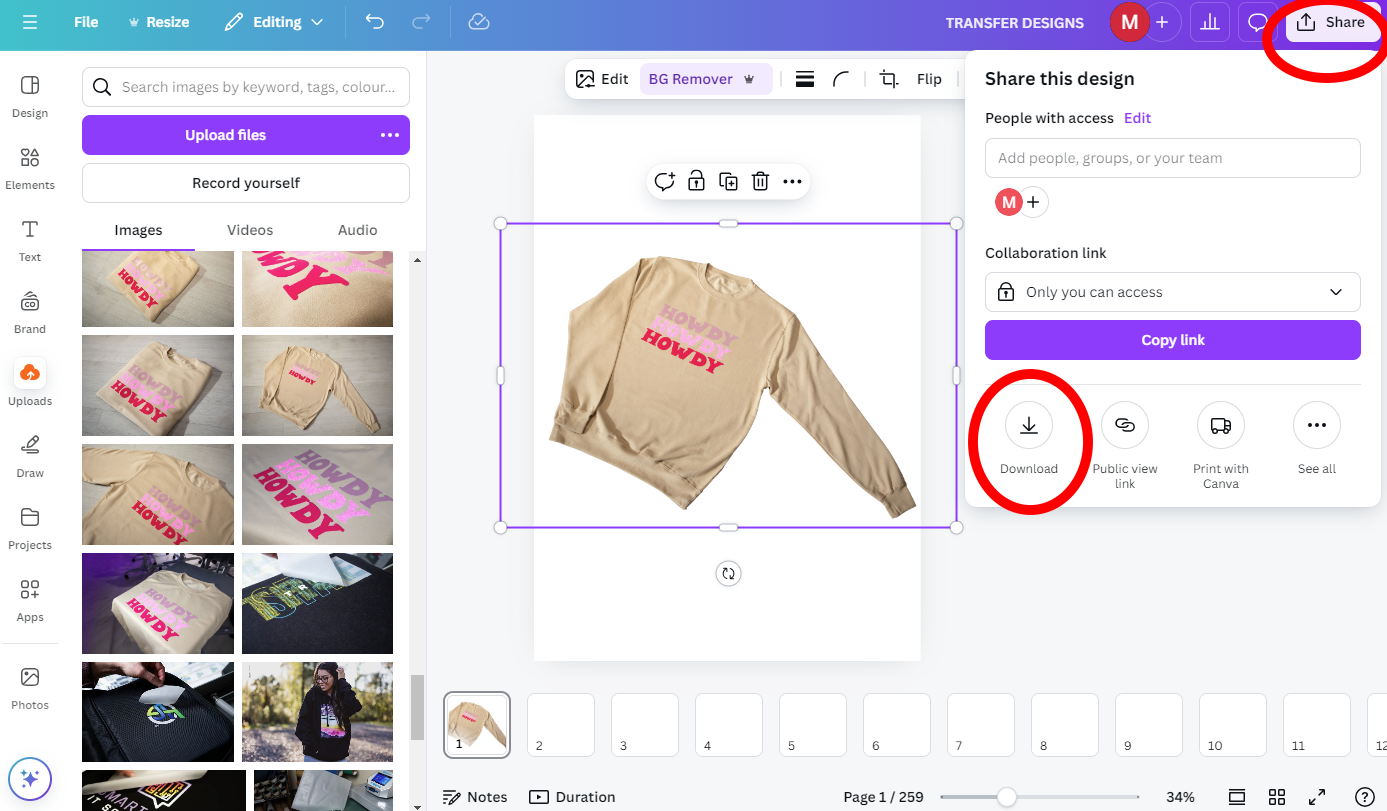
Now it's time to save and export the image with a transparent background.
In the top right-hand corner, Canva has a 'Share' button that offers many different ways to share your page but today, we want to click the 'Download' button.
Stay tuned for the correct download settings.

Before we move onto download settings, I just want to touch on Canva graphics. Alot of the canva graphic library comes with a clear background as you can see in the image below. I have changed the background canvas to a different colour in each image to demonstrate where the Canva graphic ends and the background canvas begins. If you choose to use Canva graphics like the example below, you do not need to use the Background Remover tool as it has already been removed by Canva


Downloading Transparent Graphics from Canva
Once you click the Download button, a menu box will appear. Here you will have the option to download your page in multiple formats such as an MP4 video or JPG etc.
Because we have spent the time removing the background from our subject, we are looking for a transparent background image today so today we will need to export this file as a PNG file.
(For comparison purposes, below you will see the difference between the menu box when downloading a PNG and a JPG menu box. The JPG menu box has no option for Transparency)
Before you click the download button, consider the sliders and check boxes that are available. Most of them relate to the size and quality of the file. By sliding the 'Size' scale, this will increase or decrease the size and quality of the export. The most important thing aside from choosing a good quality setting is the click the 'Transparent Background' box when you download.
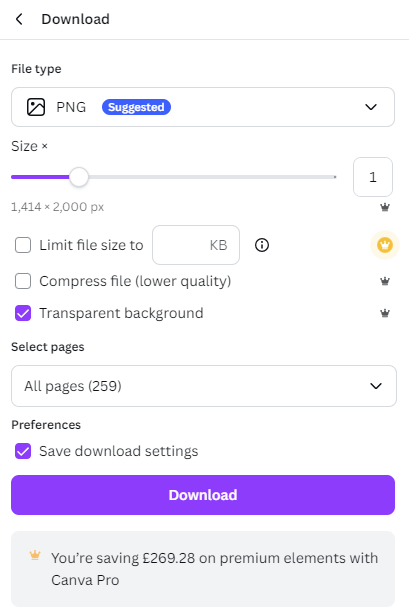

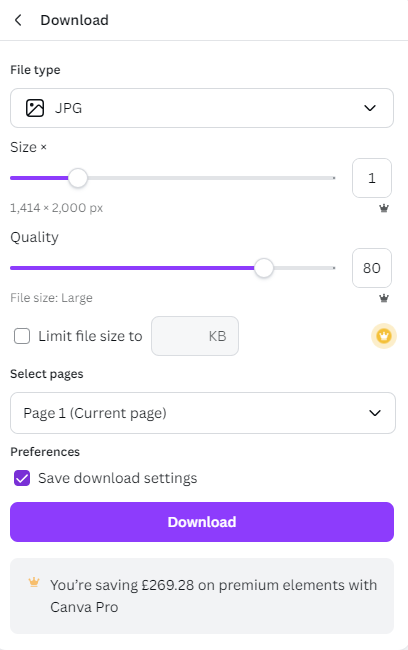

So what's the difference?
Below, we've lined up a JPEG export next to a PNG export with a transparent background. It has been uploaded into the Stahls' EasyView Uploading system for ordering heat transfers. As you can see from the image on the right hand side, there is no white background. The grey canvas that represents the heat transfer sheet space is visible behind the design. This is not the case with the JPG uploaded on the left hand side where you can see the while box in the background.
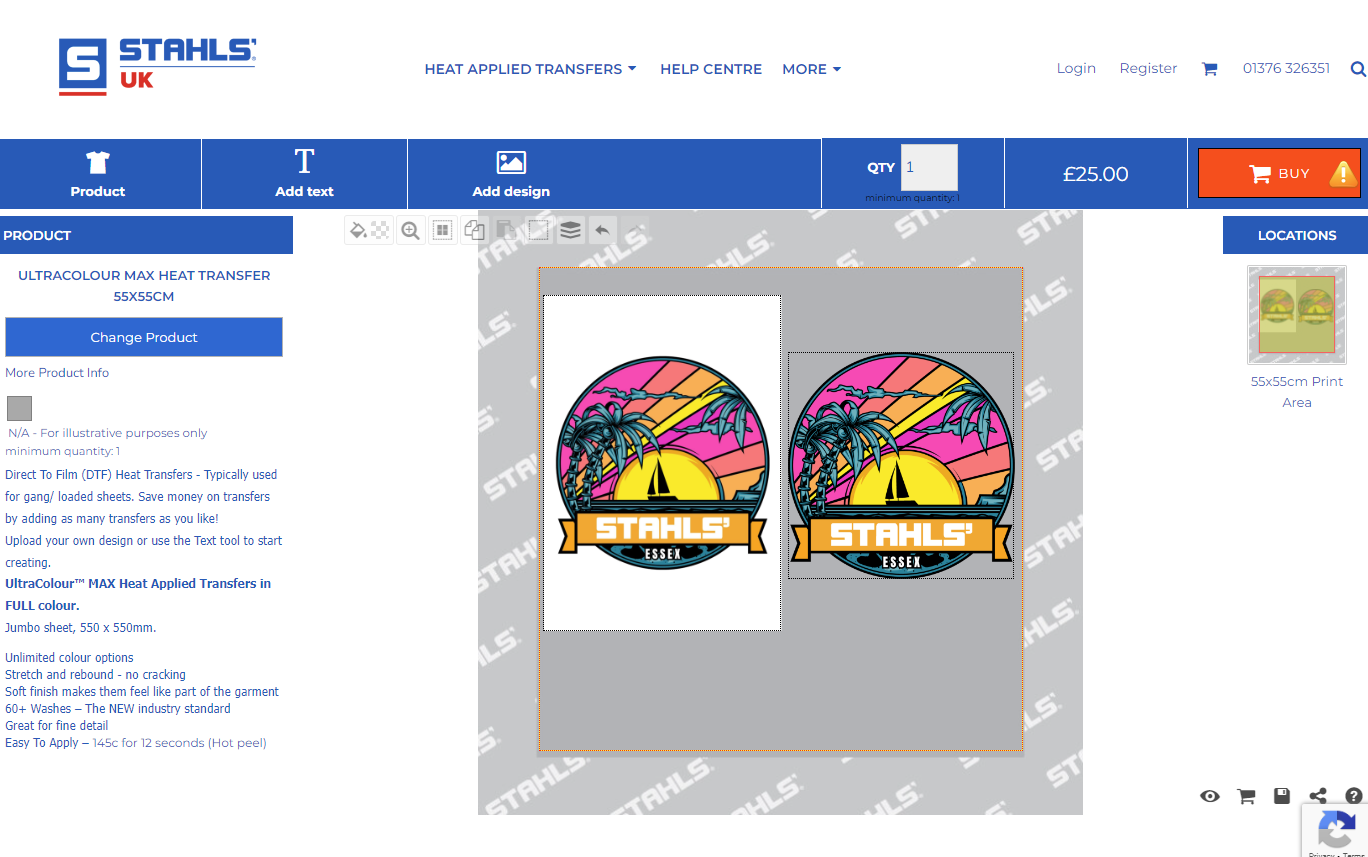

So there you have it! With the use of Canva Pro's Background remover tool and Transparent Background PNG export setting, you can avoid heat transfer delays and artworking fees because you'll never suffer the dreaded 'white background syndrome' ever again!
Find out more about Stahls' UK's heat transfer ordering system and which transfers they offer by clicking the link below:

